For a perfect part for injection molding,
First, we need to understand the basics of injection molding. As we know it’s a manufacturing process where plastic is melted and injected into a mold to create parts. But to write a guide, we should delve deeper into how the process works, the materials involved, and the common applications. Maybe we should start by explaining the injection molding process step by step.
Next, the design considerations. This seems crucial because designing for injection molding requires specific knowledge to ensure parts can be manufactured efficiently. we should think about factors like part geometry, material selection, tolerances, and draft angles. Wall thickness is another important aspect—too thick and it might cause sink marks or warping, too thin and it might not be strong enough.
Then, we need to cover the design for manufacturability (DFM). This includes aspects like minimizing undercuts, avoiding complex geometries that could complicate the mold design, and ensuring proper ejection from the mold. Maybe we should also talk about the importance of draft angles and how they facilitate part ejection without damaging the mold or the part.
Material selection is another big topic. Different plastics have different properties—some are more flexible, others are rigid, some can withstand high temperatures. we should explain how the choice of material affects the design, such as shrinkage rates and thermal expansion, which can impact the final dimensions of the part.
Next point to address is the tooling and mold design. This includes the layout of the mold, runner systems, gates, and ejector pins. It’s important to explain how the placement of these elements can influence the quality and consistency of the molded parts. We will be discussing common mold types, like single-cavity vs. multi-cavity molds, and the trade-offs between them.
Surface finishing and textures are another aspect to cover. Different finishes can affect the aesthetics and functionality of the part. Next, we will explain the various options available and how they are applied during the molding process.
Considering assembly and post-molding operations is also essential. If the part is going to be assembled with other components, the design should accommodate that, perhaps with features like snap fits or bosses for screws. Additionally, post-molding steps like painting or adding labels should be considered in the design phase.
Testing and validation are critical before moving to mass production. I should talk about the different types of testing, such as mechanical testing to check strength and durability, and thermal testing to see how the part behaves under different temperatures. Prototyping with methods like 3D printing can help catch design flaws early on.
Sustainability is becoming increasingly important, so we should include a section on designing for recyclability and reducing material waste. Maybe discuss how using bioplastics or optimizing part weight can make the product more environmentally friendly.
Cost considerations are also vital. We need to explain how design choices can impact production costs, such as complex geometries leading to more expensive molds. Offering tips on how to balance performance with cost-effectiveness would be helpful.
Including case studies could provide real-world examples of successful injection-molded parts and the challenges faced during their design. This would make the guide more practical and relatable.
Finally, we should wrap it up with best practices and future trends in injection molding, like advancements in materials, automation, and digital manufacturing. This would give readers a sense of where the industry is heading and how they can stay ahead.
Injection molding is one of the most widely used manufacturing processes for producing plastic parts. It offers high precision, scalability, and cost-effectiveness, making it a preferred method for industries ranging from consumer goods to automotive. However, designing parts for injection molding requires a deep understanding of the process, materials, and design principles. This guide provides expert insights into designing parts for injection molding, ensuring that your designs are manufacturable, efficient, and meet the required performance standards.
Table of Contents
1. [Introduction to Injection Molding](#introduction-to-injection-molding)
2. [Design Considerations for Injection Molding](#design-considerations-for-injection-molding)
3. [Material Selection for Injection Molding](#material-selection-for-injection-molding)
4. [Design for Manufacturability (DFM)](#design-for-manufacturability-dfm)
5. [Tooling and Mold Design](#tooling-and-mold-design)
6. [Surface Finishing and Textures](#surface-finishing-and-textures)
7. [Assembly and Post-Molding Operations](#assembly-and-post-molding-operations)
8. [Testing and Validation](#testing-and-validation)
9. [Sustainability in Injection Molding](#sustainability-in-injection-molding)
10. [Cost Considerations and Optimization](#cost-considerations-and-optimization)
11. [Case Studies and Examples](#case-studies-and-examples)
12. [Best Practices and Future Trends](#best-practices-and-future-trends)
Introduction to Injection Molding
Injection molding is a manufacturing process where molten plastic is injected into a mold cavity. Once the plastic cools and solidifies, the mold opens, and the part is ejected. This process is highly versatile and can produce parts with complex geometries, tight tolerances, and high volumes.
Key Components of Injection Molding
1. Plastic Material: The raw material used, typically thermoplastic or thermosetting polymers.
2. Mold: A metal cavity that shapes the molten plastic into the desired form.
3. Injection Unit: Responsible for melting the plastic and injecting it into the mold.
4. Ejection System: Mechanism that removes the part from the mold after cooling.
Advantages of Injection Molding
– High Volume Production: Suitable for producing large quantities of parts.
– Complex Geometries: Capable of creating intricate shapes and features.
– Low Labor Costs: Automated process reduces the need for manual intervention.
– Material Efficiency: Minimal waste compared to other manufacturing methods.
Common Applications
– Consumer goods (e.g., household items, electronics)
– Automotive components
– Medical devices
– Packaging
Design Considerations for Injection Molding
Designing parts for injection molding requires careful consideration of several factors to ensure manufacturability, functionality, and cost-effectiveness.
Part Geometry
– Wall Thickness: In injection molding, wall thickness plays a crucial role in ensuring part quality, strength, and manufacturability. Ideally, walls should be uniform to promote consistent cooling and prevent defects like warping, sink marks, or internal stresses. Recommended thickness varies by material—ABS (1.2–3.5 mm), Polypropylene (0.8–3.0 mm), and Polycarbonate (1.0–4.0 mm). Avoid abrupt changes in thickness; instead, use gradual transitions or tapers to maintain flow consistency. Overly thick sections can lead to long cooling times and defects, while very thin walls may result in incomplete filling. Always balance strength, material flow, and mold ability when deciding wall thickness for optimal injection-molded part performance.
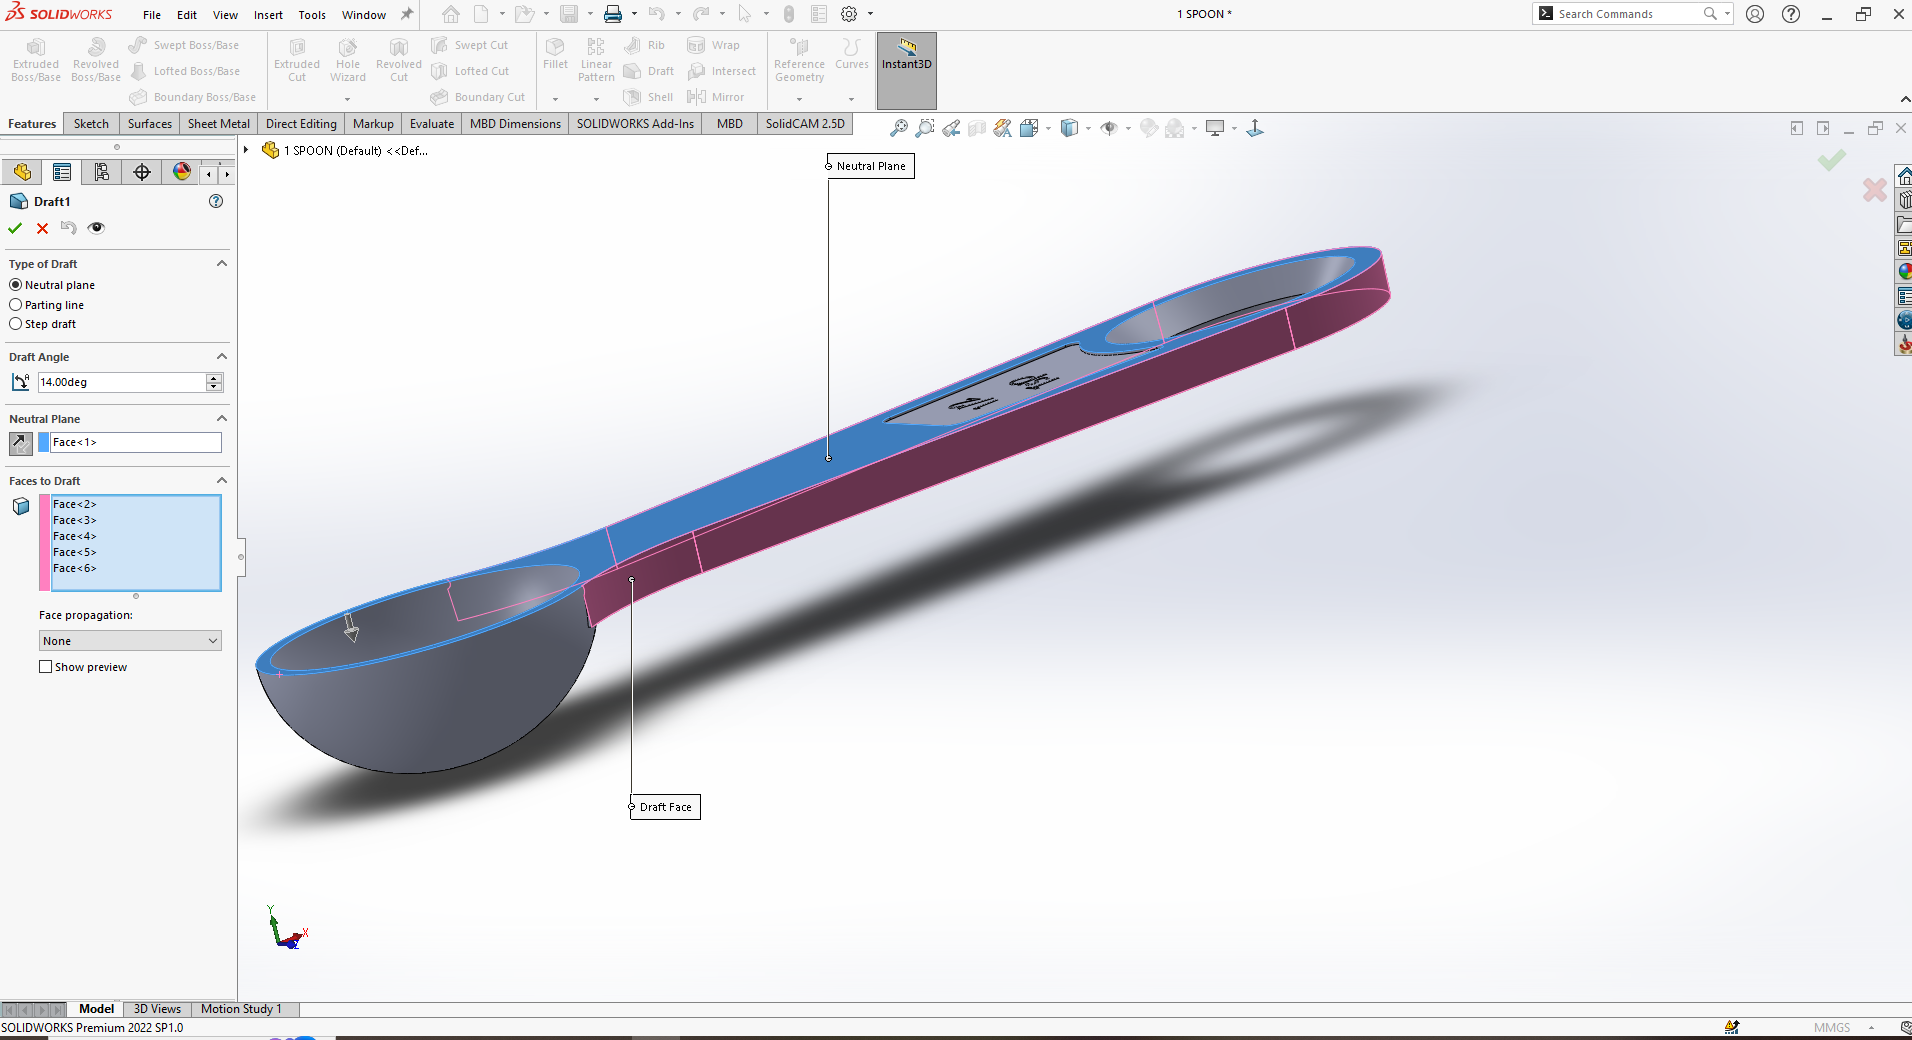
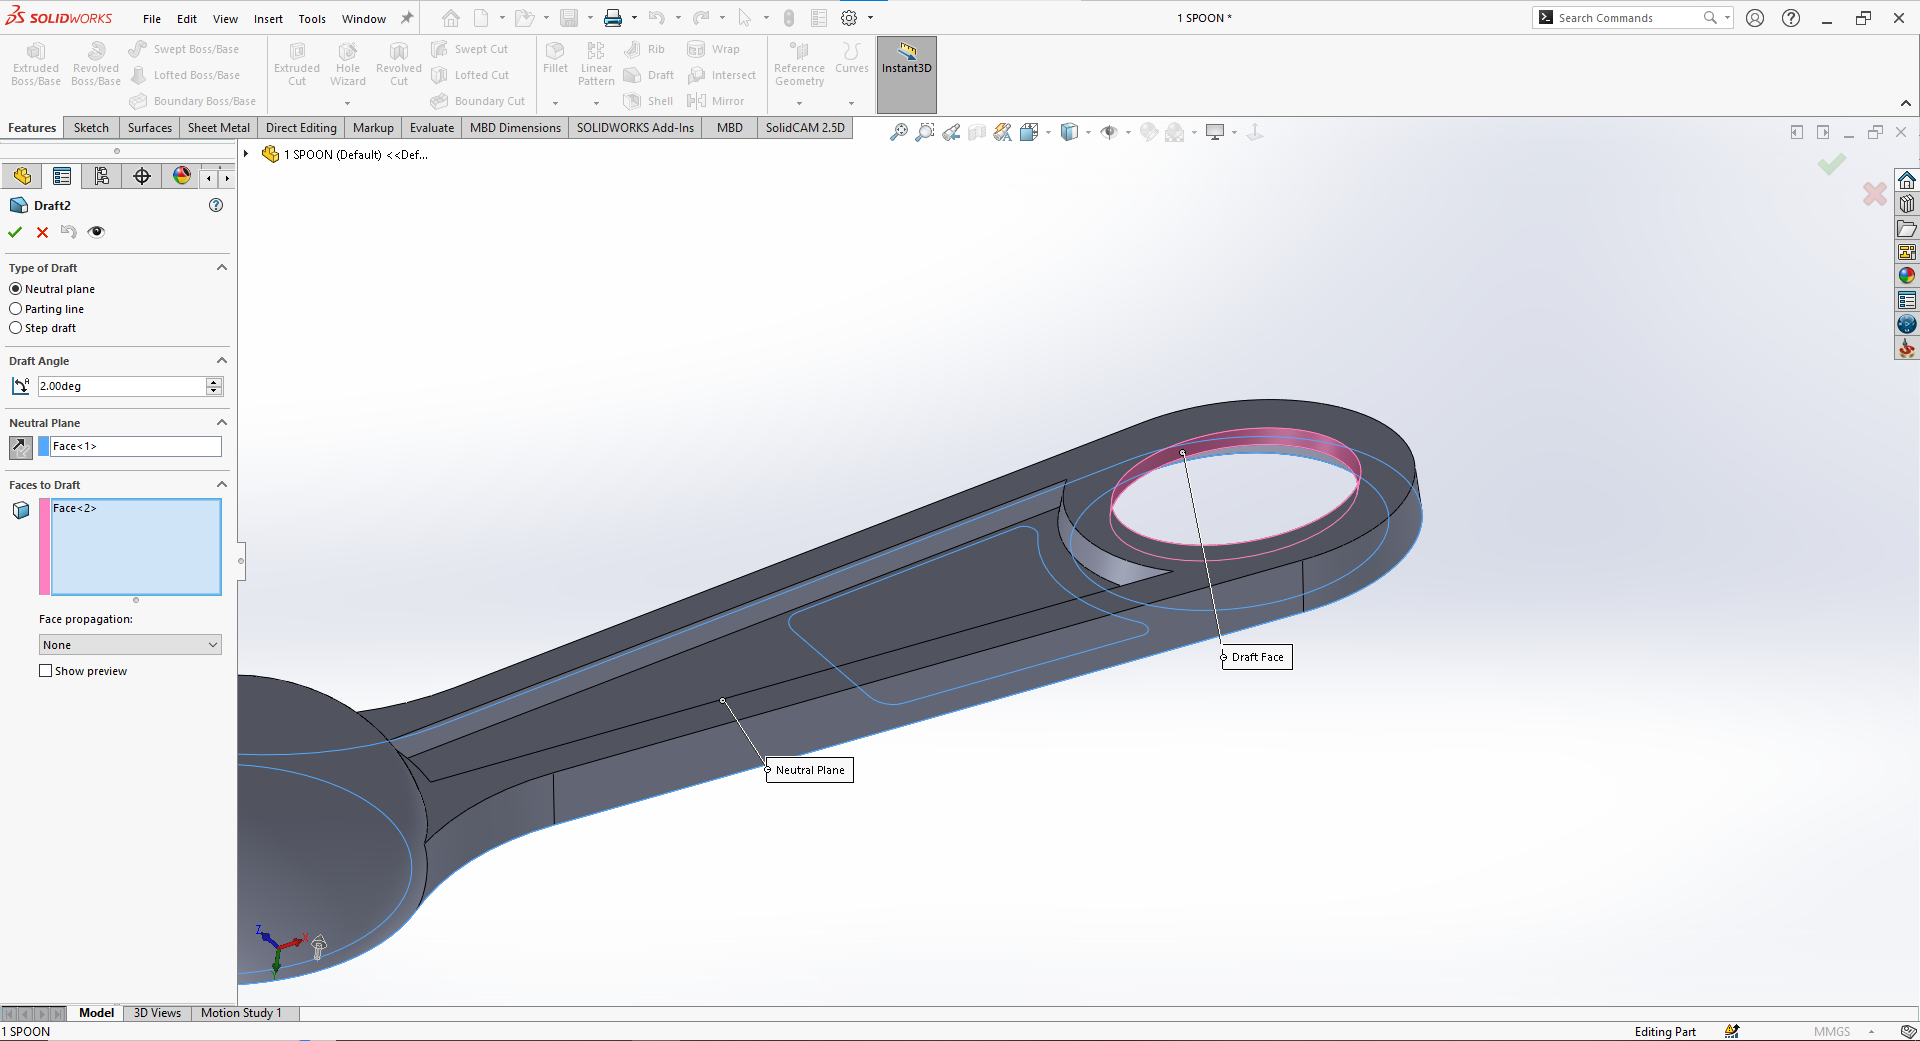
– Draft Angles: In injection molding, a draft angle is the slight taper applied to vertical surfaces of a part to facilitate easy ejection from the mold. Without adequate draft, parts can stick, causing damage or requiring excessive ejection force. A typical draft angle ranges from 1° to 2° per side, but more may be needed for textured or deep parts. Proper draft improves mold longevity and ensures smooth part release, reducing defects and production delays. All faces perpendicular to the mold opening direction should have draft applied. Designing with draft in mind is essential for moldability, efficiency, and consistent part quality.
– Radius and Fillets: In injection molding, radii and fillets are rounded transitions between surfaces that reduce stress concentrations, improve material flow, and enhance part strength. Sharp corners, especially internal ones, can cause weak points, warping, or incomplete filling. Adding fillets (internal curves) and radii (external curves) helps maintain uniform wall thickness and reduces wear on the mold. A good rule is to use an internal radius of at least 0.5× the wall thickness and match external radii accordingly. These smooth transitions also aid in ejection and overall part aesthetics. Proper use of fillets and radii is essential for durable, high-quality molded parts.
2. Material Selection
– Thermoplastics: Commonly used due to their re-meltable nature (e.g., PP, ABS, PC).
– Thermosets: Used for high-temperature applications but are not reusable once set.
– Additives: Include fillers, colorants, or reinforcements based on the desired properties.
3. Tolerances
– Dimensional Tolerance: Typically ±0.1mm to ±0.5mm, depending on the material and part size.
– Surface Finish: Specify surface roughness (e.g., Ra 1.6 to Ra 12.5) based on the application.
4. Ejection and Mold Release
– Ejector Pins: Ejector pins are critical components in injection molding that push the finished part out of the mold once it has cooled and solidified. Located on the mold’s core side, they apply a controlled force to release the part without causing damage or deformation. Ejector pins are typically round and leave small, often visible marks on non-cosmetic surfaces. Proper pin placement is crucial to avoid warping or sticking, especially on large or thin-walled parts. Designers should provide flat, reinforced areas—called ejector pads—for pin contact. Effective ejection ensures consistent cycle times, part quality, and mold longevity in high-volume manufacturing.
-Mold Release: Design features to minimize the need for mold release agents, such as textured surfaces or draft angles.
5. Ribs and Bosses
– Ribs: Ribs in injection molding are thin, protruding features used to reinforce plastic parts without adding excessive material or increasing wall thickness. They enhance structural rigidity, prevent bending, and support other features like bosses or mounting points. To avoid sink marks and warping, ribs should be designed with proper proportions: typically 50–70% of the adjacent wall thickness and no taller than three times that thickness. Draft angles of 0.5–1° and rounded bases help ensure smooth ejection and reduce stress concentrations. Well-designed ribs improve mechanical performance while maintaining moldability, ensuring strong, lightweight, and visually acceptable injection-molded components.
– Bosses: Bosses in injection molding are raised cylindrical features typically used for assembly purposes, such as accommodating screws, inserts, or aligning parts. They should be designed with wall thickness no more than 60% of the adjoining wall to avoid sink marks and warping. Adding fillets at the base and reinforcing them with ribs or gussets enhances strength. Proper draft angles (typically 0.5–1°) help with ejection. Well-designed bosses improve part functionality, structural support, and manufacturability.
6. Holes and Threads
– Hole Diameter: In injection molding, hole diameter must be carefully designed to ensure moldability and part strength. Small holes can be difficult to mold accurately, while large holes may weaken the structure. A minimum diameter of 1 mm is recommended, depending on material and wall thickness. Holes should be placed with enough spacing from edges and other features to prevent stress concentration. For deep holes, core pins are used, and slight draft may be added to aid ejection and reduce wear.
– Threads: In injection molding, thread diameter must be designed to ensure accurate molding and part strength. External threads are easier to mold than internal ones and should include a draft angle of 1–2° for smooth ejection. For internal threads, collapsible cores or unscrewing mechanisms may be required, increasing mold complexity. Threads should be coarse rather than fine to ensure proper filling and durability. The minimum recommended thread diameter is typically 5 mm, with sufficient clearance to avoid weak walls or distortion.
7. Snap Fits and Assembly Features
– Snap Fits: Design cantilever beams with adequate deflection (0.5mm to 2mm) and return angle (30° to 45°).
– Assembly Features: Incorporate alignment features (e.g., guide pins, keyways) for ease of assembly.
8. Mold Flow and Fill Analysis
– Flow Length-to-Thinness Ratio: Optimize the flow path to ensure even filling and minimize material pressure.
– Weld Lines: Avoid placing critical features where weld lines may form, as they can weaken the part.
9. Cooling and Shrinkage
– Cooling Time: Ensure sufficient cooling time to prevent warping and dimensional inaccuracies.
– Shrinkage: Account for material shrinkage (typically 0.1% to 2%) in your design.
10. Aesthetics and Branding
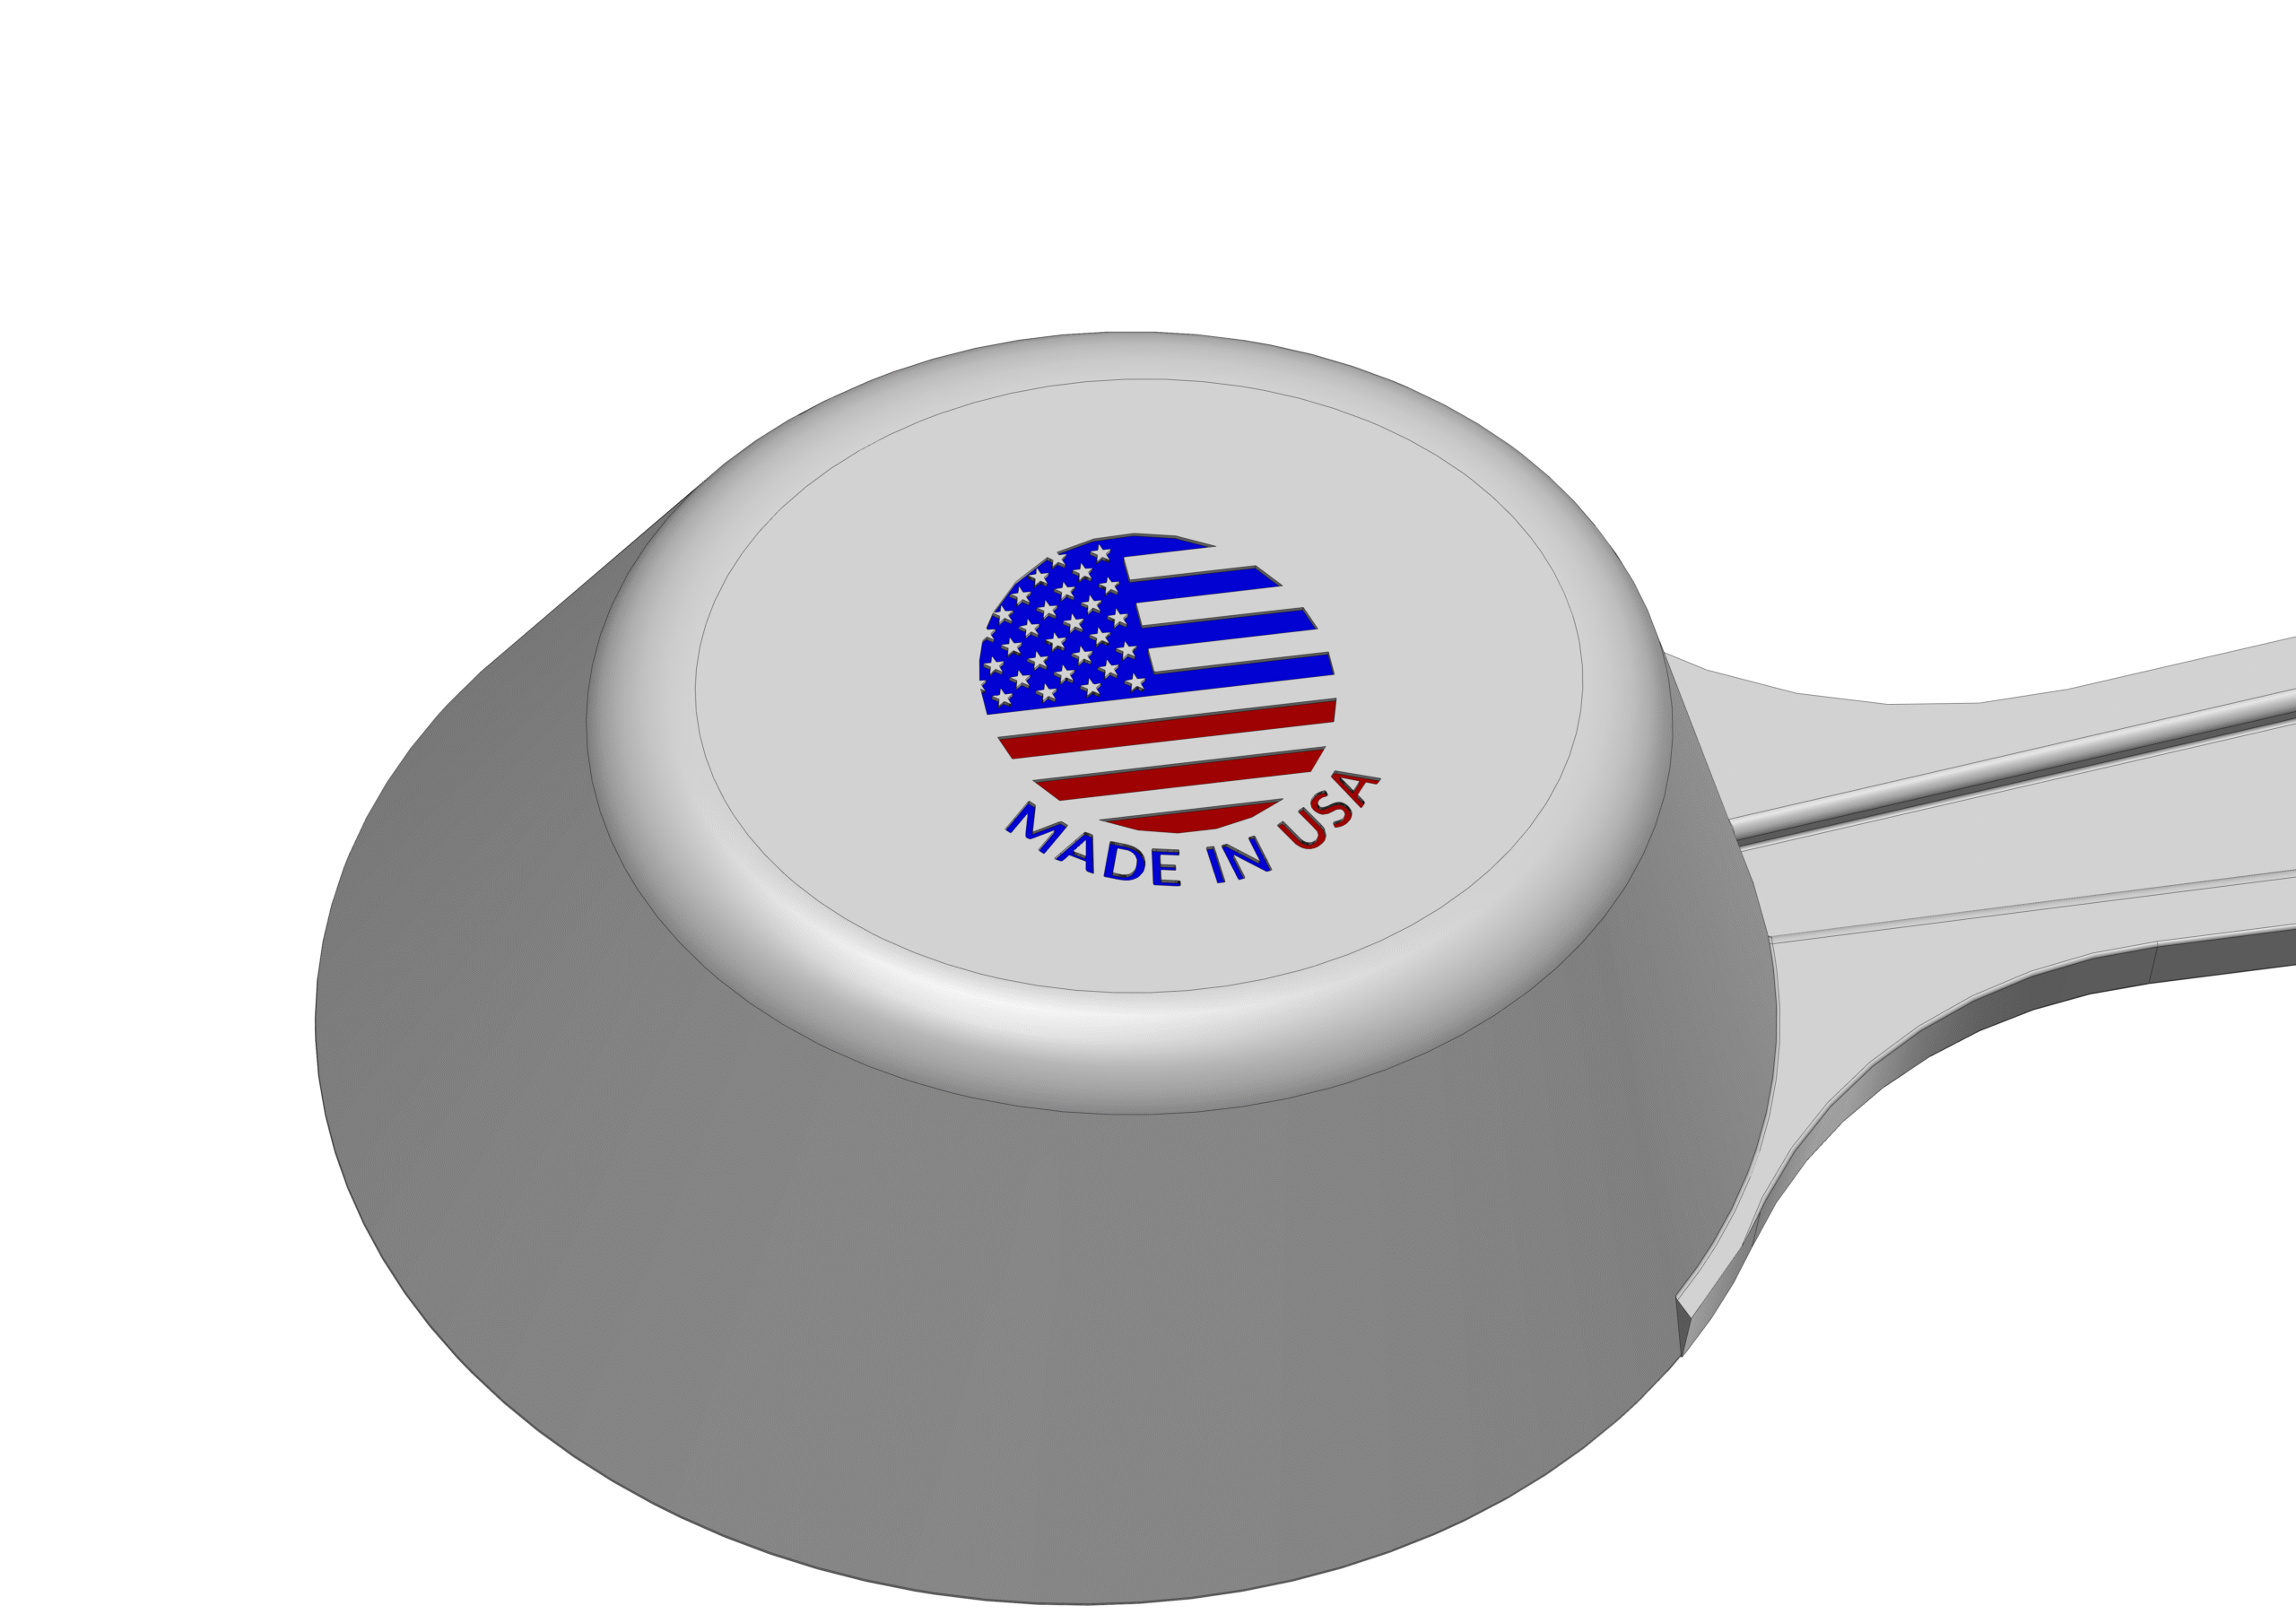
– Logos and Markings: In injection molding, logo engraving should be designed with clear, moldable dimensions to ensure readability and ease of manufacturing. The minimum line width (diameter) for engraved features is typically 0.25 mm, depending on the material and mold precision. Engravings should not be too deep—usually 0.1 to 0.3 mm—to avoid sink marks and ensure smooth ejection. Placement on flat, non-critical surfaces is ideal. Adequate draft angles (at least 1°) help prevent damage during demolding and improve logo clarity.
Material Selection for Injection Molding
The choice of material is critical for the performance, cost, and manufacturability of your part.
Common Materials
1. Polypropylene (PP): Lightweight, flexible, and chemical-resistant.
2. Acrylonitrile Butadiene Styrene (ABS): Impact-resistant and suitable for high-temperature applications.
3. Polycarbonate (PC): Transparent, impact-resistant, and suitable for optical applications.
4. Polyethylene (PE): Low-cost, flexible, and chemical-resistant.
5. Polyester (PET): High-strength, rigid, and suitable for packaging.
Material Properties to Consider
– Mechanical Properties: Tensile strength, impact resistance, and flexural modulus.
– Thermal Properties: Heat deflection temperature (HDT) and thermal conductivity.
– Chemical Resistance: Compatibility with chemicals and cleaning agents.
– Optical Properties: Transparency, gloss, and UV resistance.
Additives and Fillers
– Reinforcements: Glass fibers for increased strength and stiffness.
– Fillers: Minerals like calcium carbonate to reduce material costs.
– Colorants: Pigments or masterbatches for custom colors.
– UV Stabilizers: To prevent degradation from UV exposure.
Sustainability Considerations
– Recyclability: Choose materials that are recyclable or biodegradable.
– Bioplastics: Consider PLA (Polylactic Acid) or PHA (Polyhydroxyalkanoates) for eco-friendly applications.
– Material Efficiency: Optimize part weight and thickness to minimize material usage.
Design for Manufacturability (DFM)
Design for Manufacturability (DFM) is a critical aspect of injection molding that ensures your part can be produced efficiently and cost-effectively.
Key DFM Principles
1. Simplify the Design: Avoid unnecessary complexity that could increase tooling costs or lead to manufacturing defects.
2. Minimize Undercuts: Undercuts require side actions in the mold, which increase tooling complexity and cost.
3. Avoid Thin Walls: Ensure wall thickness is consistent and within recommended limits to prevent warping and sink marks.
4. Use Standard Features: Standardize features like bosses, ribs, and snaps to reduce design variability.
Moldability Analysis
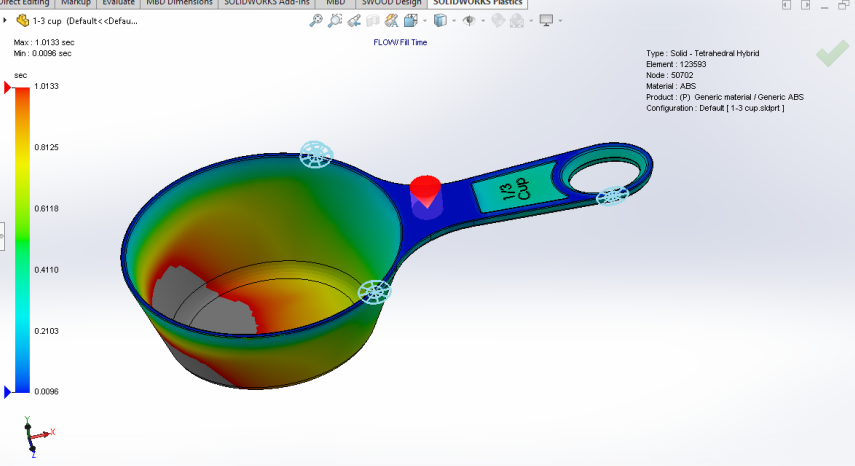
– Flow Analysis: Use simulation tools to analyze how molten plastic flows into the mold cavity.
– Pressure Drop: Ensure that the pressure drop is within acceptable limits to avoid material degradation.
– Cooling Analysis: Optimize cooling channels to ensure uniform cooling and minimize warping.
Design for Assembly (DFA)
– Snap Fits: Use snap fits to eliminate the need for fasteners.
– Alignment Features: Incorporate guide pins, keyways, or chamfers to facilitate easy assembly.
– Modular Design: Design parts that can be easily assembled into a complete product.
Cost Reduction Strategies
– Reduce Material Usage: Optimize part weight and thickness to minimize material costs.
– Simplify Tooling: Avoid complex mold features that increase tooling costs.
– Increase Production Volume: Take advantage of economies of scale by producing larger batches.
Tooling and Mold Design
The mold is a critical component of the injection molding process, and its design directly impacts the quality, cost, and lead time of your part.
Key Components of a Mold
1. Cavity: The part of the mold that shapes the plastic into the desired form.
2. Core: The part of the mold that creates holes or recesses in the part.
3. Runner System: Channels that direct molten plastic from the injection unit to the mold cavity.
4. Gates: Points where molten plastic enters the mold cavity.
5. Ejector Pins: Mechanisms that push the part out of the mold after cooling.
Mold Types
1. Single-Cavity Mold: Produces one part per cycle. Ideal for low-volume production.
2. Multi-Cavity Mold: Produces multiple parts per cycle. Ideal for high-volume production.
3. Family Mold: Produces multiple parts of similar size or shape. Reduces tooling costs.
4. Hot Runner Mold: Uses insulated runners to keep the plastic molten between shots. Reduces material waste.
Mold Materials
1. Steel: Most common mold material due to its durability and cost-effectiveness.
2. Aluminum: Used for prototype molds or low-volume production due to its faster machining time.
3. Beryllium Copper: Used for high-wear areas due to its high thermal conductivity.
Mold Surface Finish
– Polishing: Improves part quality and reduces mold wear.
– Texturing: Creates surface textures for aesthetic or functional purposes.
– Coating: Applies wear-resistant or corrosion-resistant coatings to critical areas.
Mold Maintenance
– Cleaning: Regularly clean the mold to prevent contamination and material buildup.
– Lubrication: Lubricate moving parts to reduce wear and tear.
– Inspection: Inspect the mold for damage or wear and perform repairs as needed.
Surface Finishing and Textures
Surface finishing and textures play a crucial role in the aesthetics and functionality of injection-molded parts.
Common Surface Finishes
1. Polished Finish: Achieved by polishing the mold cavity to a high gloss. Ideal for optical applications.
2. Textured Finish: Creates a specific surface texture for grip, aesthetics, or functionality.
3. Matte Finish: Provides a dull, non-reflective surface. Ideal for hiding mold marks or imperfections.
4. Etched Finish: Creates a fine, detailed texture using chemical etching.
Texture Patterns
1. Fine Texture: Provides a smooth, low-gloss surface.
2. Medium Texture: Offers a balanced combination of aesthetics and functionality.
3. Coarse Texture: Ideal for applications requiring high grip or durability.
Functional Textures
– Grip Textures: Used on handles, grips, and other areas requiring traction.
– Ventilation Textures: Create airflow or drainage in applications like filters or vents.
– Aesthetic Textures: Enhance the visual appeal of the part.
Application Methods
1. Mold Texturing: Textures are incorporated directly into the mold cavity.
2. Post-Molding Texturing: Textures are applied after molding using processes like laser etching or pad printing.
3. Insert Molding: Textures are molded into inserts that are then assembled into the final part.
Assembly and Post-Molding Operations
Many injection-molded parts require additional assembly or post-molding operations to meet their functional requirements.
Assembly Methods
1. Snap Fits: Use cantilever beams or other snap-fit features to eliminate the need for fasteners.
2. Ultrasonic Welding: Join parts using high-frequency vibrations to create a strong bond.
3. Adhesive Bonding: Use adhesives to join parts, especially when different materials are involved.
4. Screw or Rivet Assembly: Use mechanical fasteners for applications requiring high strength or adjustability.
Post-Molding Operations
1. Printing: Apply labels, logos, or other graphics using screen printing, pad printing, or laser marking.
2. Painting: Apply paint for aesthetic or functional purposes, such as color matching or UV resistance.
3. Plating: Apply metal coatings for conductivity, corrosion resistance, or aesthetics.
4. Machining: Perform secondary machining operations like drilling, tapping, or grinding for precision features.
Automation in Assembly
– Robotic Assembly: Use robots to automate repetitive tasks like screw driving or welding.
– Vision Systems: Use vision systems to inspect and guide assembly operations.
– Conveyor Systems: Use conveyor systems to move parts through the assembly line efficiently.
Design for Assembly (DFA)
– Simplify the Design: Minimize the number of parts and fasteners to reduce assembly time and cost.
– Modular Design: Design parts that can be easily assembled into a complete product.
– Alignment Features: Incorporate guide pins, keyways, or chamfers to facilitate easy alignment during assembly.
Testing and Validation
Before moving to mass production, it’s essential to test and validate your design to ensure it meets the required performance, safety, and quality standards.
Types of Testing
1. Mechanical Testing: Evaluate the part’s strength, stiffness, and impact resistance.
2. Thermal Testing: Test the part’s performance under extreme temperatures.
3. Chemical Resistance Testing: Assess the part’s resistance to chemicals and cleaning agents.
4. Optical Testing: Evaluate the part’s clarity, gloss, and UV resistance.
5. Functional Testing: Test the part’s functionality in its intended application.
Prototyping and Iteration
– Rapid Prototyping: Use 3D printing or CNC machining to create prototypes for testing.
– Design Iteratio: Refine the design based on test results and feedback.
– Design Freeze: Finalize the design once all issues have been resolved.
Quality Control
– Inspection: Regularly inspect parts for defects or variations.
– Dimensional Measurement: Measure critical dimensions to ensure compliance with specifications.
– Statistical Process Control (SPC): Monitor the production process to maintain consistent quality.
Sustainability in Injection Molding
As environmental concerns grow, designing sustainable injection-molded parts is becoming increasingly important.
Key Sustainability Considerations
1. Material Selection: Choose materials that are recyclable, biodegradable, or made from renewable resources.
2. Material Efficiency: Optimize part weight and thickness to minimize material usage.
3. Energy Efficiency: Design parts that can be produced using less energy and water.
4. End-of-Life Design: Design parts for disassembly, recycling, or biodegradation.
Bioplastics
– PLA (Polylactic Acid): A biodegradable thermoplastic made from renewable resources like corn starch or sugarcane.
– PHA (Polyhydroxyalkanoates): A biodegradable thermoplastic produced from bacterial fermentation.
– PBAT (Polybutylene Adipate-co-Butylene Terephthalate): A biodegradable thermoplastic used for flexible applications.
Recyclable Materials
– Recycled Plastics: Use post-consumer recycled (PCR) or post-industrial recycled (PIR) materials.
– Material Identification: Use material identification codes to facilitate sorting and recycling.
Design for Recyclability
– Simplify the Design: Avoid complex geometries or multiple materials that complicate recycling.
– Material Separation: Design parts that can be easily disassembled and separated into different materials.
– Avoid Contaminants: Minimize the use of additives, coatings, or adhesives that can contaminate recycled materials.
Cost Considerations and Optimization
Understanding the cost drivers in injection molding is essential for optimizing your design and reducing production expenses.
Key Cost Drivers
1. Tooling Costs: The cost of designing and building the mold is a significant upfront expense.
2. Material Costs: The cost of the plastic material used to produce the part.
3. Production Volume: Higher production volumes reduce the per-unit cost due to economies of scale.
4. Complexity: Complex geometries, undercuts, and multiple cavities increase tooling and production costs.
Cost Reduction Strategies
1. Simplify the Design: Avoid unnecessary complexity that increases tooling and production costs.
2. Use Standard Features: Standardize features like bosses, ribs, and snaps to reduce design variability.
3. Optimize Material Usage: Minimize material waste by optimizing part weight and thickness.
4. Use Recycled Materials: Incorporate recycled plastics to reduce material costs.
5. Increase Production Volume: Take advantage of economies of scale by producing larger batches.
Total Cost of Ownership (TCO)
– Material Costs: The cost of the plastic material over the product’s lifecycle.
– Tooling Costs: The upfront cost of designing and building the mold.
– Production Costs: The cost of producing the part, including labor, energy, and overhead.
– Post-Molding Costs: The cost of additional operations like assembly, painting, or packaging.
– Warranty and Repair Costs: The cost of repairing or replacing defective parts.
Case Studies and Examples
Real-world examples provide valuable insights into the challenges and opportunities of designing parts for injection molding.
Case Study 1: Consumer Electronics Housing
– Challenge: Design a lightweight, impact-resistant housing for a portable electronic device.
– Solution: Use ABS for its high impact resistance and process ability. Incorporate ribs and gussets for added stiffness without increasing material usage.
– Outcome: A durable, cost-effective housing that meets the required performance and aesthetic standards.
Case Study 2: Medical Device Component
– Challenge: Design a clear, autoclavable component for a medical device.
– Solution: Use PC for its transparency and high heat resistance. Incorporate textured surfaces for grip and alignment features for easy assembly.
– Outcome: A component that meets strict medical standards for clarity, sterility, and functionality.
Case Study 3: Automotive Part
– Challenge: Design a lightweight, heat-resistant part for an automotive application.
– Solution: Use a glass-filled PA6 for its high strength, stiffness, and heat resistance. Optimize the design for minimal material usage and easy assembly.
– Outcome: A cost-effective, high-performance part that meets the demanding requirements of the automotive industry.
Best Practices and Future Trends
Adhering to best practices and staying informed about future trends ensures that your designs remain competitive and innovative.
Best Practices
1. Collaborate with Mold Makers: Work closely with mold makers to ensure your design is manufacturable.
2. Use Simulation Tools: Utilize mold flow and structural analysis tools to optimize your design.
3. Consider Sustainability: Design parts with sustainability in mind, using recyclable or biodegradable materials.
4. Iterate and Refine: Continuously refine your design based on testing and feedback.
Future Trends
1. Advanced Materials: Development of new materials with enhanced properties, such as self-healing plastics.
2. Digital Manufacturing: Increased use of digital tools for design, simulation, and production.
3. Circular Economy: Focus on designing parts for recyclability, reusability, and biodegradability.
4. Additive Manufacturing: Integration of additive manufacturing techniques with injection molding for hybrid production methods.
By following the insights and guidelines outlined in this guide, you can design injection-molded parts that are functional, cost-effective, and sustainable. Whether you’re a seasoned designer or just starting out, understanding the principles of injection molding will empower you to create innovative solutions that meet the demands of modern manufacturing.


 4. Add ribs using Rib tool with automatic draft.