
Design, Plastics, Bill of Materials & U.S. Supplier Sourcing Guide
From concept and DFM to prototype, supplier qualification and production launch
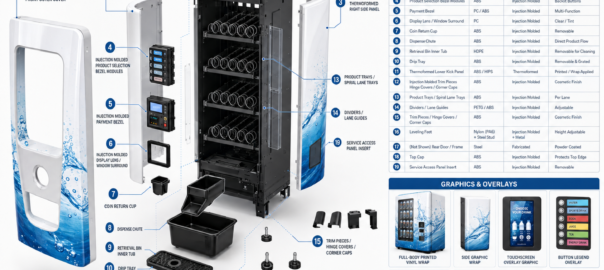
Typical thermoformed covers, injection molded functional parts and branding elements used in a beverage vending machine.
| Purpose of this guide: Provide a practical roadmap for companies developing or redesigning a vending machine and sourcing its mechanical, plastic, electronic, payment, refrigeration and graphic components in the United States. |
1. Vending Machines: Plastics in Action
A vending machine is a compact automated retail system that combines mechanical structures, electronics, payment hardware, product handling, thermal management and a customer interface. The original article correctly identifies injection molded plastics, thermoformed plastics and fiberglass as important material families; this expanded guide places those materials within the complete product architecture and sourcing process.
Reference machines illustrate two common industrial-design directions: a graphic-wrapped cabinet and a sculpted, appliance-style enclosure.
Outer cabinet and structural frame
Protects the machine and carries doors, shelves, cooling equipment and internal modules. Sheet metal is common for the structural chassis; thermoformed ABS/HIPS or fiberglass can be used as exterior skins, side panels, canopies and branded surrounds.
Front door and user interface
The main customer touchpoint. Typical plastic parts include thermoformed fascia panels, injection molded bezels, payment-module housings, display surrounds, keypad frames, trim pieces and product-retrieval door components.
Payment system
Accepts cards, mobile payments, bills or coins. Use dedicated commercial payment modules; plastic housings, bezels and chutes can be custom molded around those modules.
Product storage
Shelves, trays, lane dividers, spirals, pushers and guides hold and organize products. Geometry must match the product envelope and dispensing method.
Dispensing mechanism
Motors, gearboxes, spirals, pushers, gates and drop chutes move the selected item from storage to the retrieval area.
Cooling and insulation
Refrigerated machines typically use a compressor/condenser/evaporator system, airflow ducts, insulation, gaskets and an inner liner. Molded ducts and thermoformed liners simplify airflow management and cleaning.
Electronics housing
Contains the controller, power supply, communication hardware, sensors and wiring. Molded casings and protective covers help isolate electronics and create serviceable modules.
Graphics and branding
Full-body vinyl wraps, printed inserts, screen-printed overlays, backlit graphics, decals, safety labels and product-selection legends create the customer-facing brand and operating instructions.
How the Machine Operates
- Customer selects a product through buttons or a touchscreen.
- Payment hardware validates the transaction and communicates authorization to the machine controller.
- The controller identifies the selected lane and activates the corresponding motor, pusher, gate or other dispensing actuator.
- The product is released from the storage lane and guided toward the delivery area.
- Sensors can confirm vend completion, product drop, door position and other conditions.
- The retrieval bin or door provides customer access while preventing unauthorized reach into the product compartment.
- For refrigerated units, the thermal-management system maintains the programmed temperature range while fans distribute conditioned air.
2. How to Design a Vending Machine
The most reliable approach is to design the machine as a platform made of serviceable modules rather than as one large assembly. Freeze the product and business requirements first; then design the cabinet, dispensing architecture, user interface and sourcing package around them.
1. Define the product and operating environment
Specify what will be sold, package dimensions, weight, fragility, temperature requirements, number of SKUs, capacity, indoor/outdoor location, ambient temperature, moisture exposure, vandal resistance, cleaning requirements and target machine life.
2. Set the commercial requirements
Define target unit cost, expected annual volume, prototype quantity, service model, payment methods, telemetry requirements, branding strategy and installation constraints.
3. Create the system architecture
Break the machine into cabinet/frame, door/UI, payment, product-storage module, dispensing mechanism, retrieval system, refrigeration/airflow, controls/electrical, graphics and service-access modules. Assign interfaces between modules early.
4. Choose the dispensing method
Use spirals for many packaged snacks, pushers/gates for bottles or cans, conveyor/elevator systems for fragile products, lockers for controlled access, or custom mechanisms for nonstandard goods. Prototype this subsystem before finalizing the cabinet.
5. Develop industrial design and ergonomics
Create the customer-facing shape, screen/button locations, product visibility, retrieval-door position and service-door access. Plan graphic zones at the same time as panel geometry.
6. Select materials and processes using DFM
Use sheet metal for load-bearing chassis members; thermoforming for large exterior skins and liners; injection molding for precise high-repeat functional parts; clear PC/PETG for windows; elastomers for seals; and printed films/vinyl for graphics.
7. Design electronics and software
Specify controller architecture, motor drivers, sensors, power supply, touchscreen or buttons, communications, payment interface, firmware, remote telemetry, diagnostics and fail-safe behavior.
8. Engineer thermal management where required
Size refrigeration hardware from heat load, product pull-down requirements, door openings, insulation and ambient conditions. Design ducts and fan paths so air reaches all product zones without excessive frost or hot spots.
9. Design for serviceability
Use modular shelves, accessible fasteners, keyed connectors, removable drip/retrieval trays, replaceable payment modules, diagnostic access and service panels. A machine that is easy to repair has lower lifecycle cost even if the initial BOM is slightly higher.
10. Prototype, test, pilot and release
Build mechanism prototypes first, then an engineering prototype, then a design-validation build and a pilot run. Close failures before committing to high-cost production tooling.
| Design rule: Do not release expensive injection molds until the product envelope, interfaces, critical dimensions and dispensing mechanism have passed prototype testing. Thermoformed panels are often easier and less expensive to revise during early industrial-design iterations. |
Material and Process Selection for the Plastic BOM
| Typical Part | Preferred Process | Common Materials | Why |
|---|---|---|---|
| Large front/side skins, canopy, kick panel | Thermoforming | ABS, HIPS, PC/ABS | Large surface area, lower tooling cost than injection molding, easy to trim and decorate. |
| Inner liner, airflow duct, service cover | Thermoforming | ABS, HIPS, HDPE, PETG | Good for large shallow or moderately deep shells; easy cleaning and low part count. |
| Payment bezel, button housing, trim | Injection molding | ABS, PC/ABS, PC | Tight details, snap fits, bosses, repeatable appearance. |
| Product tray, lane divider, pusher | Injection molding | ABS, PP, POM, nylon | Precision features, wear resistance and repeatable fit. |
| Retrieval bin / chute | Injection molding or thermoforming | HDPE, ABS, PP | Impact resistance and cleanable geometry. |
| Clear display/product window | Thermoforming / fabrication | PC, PETG, acrylic | Transparency, impact resistance and formed geometry. |
| Gaskets, bumpers, seals | Elastomer molding / extrusion | TPE, EPDM, silicone | Sealing, vibration isolation and soft-touch functions. |
| Graphics / overlays | Digital print, screen print, laminate | Vinyl, PET, polycarbonate film | Branding, labels, touchscreen/button legends and wear surfaces. |
3. Build the Bill of Materials Before You Source
A sourcing program works best when every purchased item is assigned a part number, revision, drawing/model, process, material, finish, expected annual usage and quality requirement. The BOM should distinguish custom-to-print components from commercially available modules.
| BOM Category | Where to Source | Key RFQ Information |
|---|---|---|
| Structural frame / cabinet | Sheet-metal fabrication | Laser cut/punch, bend, weld, powder coat; confirm gauge, tolerances and grounding points. |
| Door frame, hinges, latch, locks | Fabrication + commercial hardware | Specify cycle life, security level, service access, and replacement key/lock strategy. |
| Thermoformed exterior panels | Custom thermoformer | Provide CAD, material, texture/color, wall thickness, trim datum, inserts and graphic requirements. |
| Injection molded trays / housings / bezels | Custom injection molder | Provide resin grade, texture, color, draft, critical dimensions, cosmetic zones, tool ownership and annual volume. |
| Dispensing spirals / pushers / motors | OEM component supplier or custom mechanism supplier | Match torque, speed, lane pitch, product size, motor voltage and control interface. |
| Payment hardware | Established vending/payment OEM | Select card/mobile/bill/coin options, communication interface, certifications, telemetry and field service. |
| Controller / I/O electronics | Electronics OEM/ODM or contract manufacturer | Specify I/O count, motor channels, sensors, payment interface, firmware ownership and update method. |
| Touchscreen / display | Industrial display supplier | Specify brightness, operating temperature, touch technology, glass/cover lens, connector and mounting. |
| Refrigeration deck | Commercial refrigeration supplier | Specify cooling capacity, refrigerant, voltage, airflow, ambient range, serviceability and regulatory requirements. |
| Fans, ducts and filters | Fan OEM + plastic fabricator/molder | Select airflow/static pressure, acoustics, life, ingress protection and cleanability. |
| Glass / transparent window | Glass or polycarbonate fabricator | Specify safety treatment, tint, heater/anti-fog requirement and mounting method. |
| Wire harnesses | Cable/harness contract manufacturer | Provide schematic, wire gauge, connectors, labels, test requirements and UL-recognized components as applicable. |
| Fasteners / inserts | Industrial distributor | Standardize sizes and reduce unique hardware; specify captive hardware where service access is frequent. |
| Graphics / overlays / labels | Industrial graphics converter | Supply artwork files, color targets, laminate, adhesive, UV exposure, cleaning chemicals and expected life. |
| Packaging | Packaging supplier | Engineer pallet/carton/foam protection around finished machine weight, freight mode and installation method. |
4. How to Find Vending-Machine Suppliers in the USA
Start with capability-based sourcing rather than searching only for “vending machine supplier.” Many of the best sources will be specialists in a process or subsystem—thermoforming, injection molding, sheet metal, refrigeration, payment hardware, electronics, displays, wire harnesses or industrial graphics.
Industrial supplier directories
Use Thomasnet to search by process, material, location and certifications. Search terms should be specific—for example “heavy gauge ABS thermoforming Michigan,” “custom injection molded ABS housings,” “sheet metal enclosure fabrication,” “wire harness contract manufacturer” or “industrial graphics overlays.”
Industry associations and directories
Use PMMI directories to identify machinery/component suppliers, agents and distributors. For unattended retail, also use vending-industry associations, trade shows and exhibitor lists to identify payment, telemetry, refrigeration and dispensing specialists.
Trade shows
Build a supplier list from vending, convenience retail, foodservice, packaging, plastics, automation and electronics shows. Meet engineering and sales teams in person and bring a one-page sourcing brief with the BOM categories you need.
Regional manufacturing networks
Search state manufacturing associations, economic development manufacturing directories, local tool-and-die networks and regional contract manufacturers. Regional suppliers can reduce freight and make engineering changes easier during development.
Supplier referrals
Ask each selected supplier which adjacent processes they routinely integrate. A thermoformer may know graphics converters and CNC trimmers; an injection molder may know toolmakers and resin suppliers; a sheet-metal fabricator may know powder coaters and harness shops.
Existing component ecosystems
For payment, refrigeration, locks, displays, motors and controllers, prefer established commercial modules when they satisfy the requirements. Custom-design only the interfaces and parts that create differentiation.
| Useful sourcing shortcut: For custom plastic parts, issue the RFQ to a supplier that can support design-for-manufacturability, tooling, molding/forming, secondary trimming, decorating and assembly. Fewer handoffs can reduce tolerance-stack and accountability problems. |
Recommended U.S. Search Resources
Thomasnet Supplier Discovery: https://www.thomasnet.com/suppliers — Search and filter North American industrial suppliers by capability, geography and certification.
Thomasnet Plastic Thermoforming: https://www.thomasnet.com/suppliers/usa/plastic-thermoforming-61020202 — Useful starting point for U.S. thermoforming sources and material/process capability comparisons.
PMMI Sales Agent Directory: https://www.pmmi.org/sales-agent-directory — Useful for finding machinery/component sales agents and distributors serving processing and packaging markets.
NSF Food Equipment Standards: https://www.nsf.org — Review food-equipment sanitation requirements when vending food or beverages.
U.S. Access Board / ADA Guides: https://www.access-board.gov/ada/guides/ — Use accessibility guidance when locating controls and other operable elements.
5. The RFQ and Supplier-Qualification Process
A good RFQ gives suppliers enough technical and commercial information to quote the same scope. Avoid sending only a rendering or a photo. Build a controlled data package so quotes are comparable.
RFQ Package Checklist
- 3D CAD file (STEP preferred for neutral exchange) and controlled 2D drawing for critical dimensions and notes.
- Part number and revision level.
- Material specification, resin grade or approved alternatives; color and UV/flame/food-contact requirements if applicable.
- Cosmetic surface requirements, texture, gloss, grain direction and designated Class-A surfaces.
- Expected annual volume, economic order quantity, prototype quantity and forecast ramp.
- Process assumptions: injection molding, thermoforming, CNC trimming, insert molding, printing, assembly, etc.
- Tooling responsibility: tool type, expected tool life, ownership, storage, maintenance and end-of-life disposition.
- Quality requirements: first article, dimensional report, capability on critical characteristics, incoming inspection and change-control expectations.
- Packaging and delivery location.
- Target timing for prototype, tool completion, first articles and production approval.
Evaluate Suppliers on More Than Unit Price
| Supplier Evaluation Factor | Example Weight |
| Technical fit / DFM support | 20% |
| Quality system and process control | 15% |
| Tooling capability and maintenance | 15% |
| Unit price at forecast volumes | 15% |
| Lead time and capacity | 10% |
| Prototype / engineering-change responsiveness | 10% |
| Secondary operations and assembly | 5% |
| Location, logistics and inventory support | 5% |
| Financial/business continuity risk | 5% |
Questions to Ask a Plastic Molder or Thermoformer
- Can you review the CAD for draft, undercuts, wall thickness, ribs/bosses, radii and trimming strategy before tooling is released?
- What maximum part size, draw depth, clamp tonnage and material thickness can your equipment handle?
- Which engineering resins do you process regularly, and how do you control lot/color changes?
- Do you build tooling in-house or manage an external toolmaker? Who owns the tool and CAD?
- Can you provide CNC trimming, drilling, inserts, bonding, painting, screen printing, labels, graphics or subassembly?
- How are first articles measured and approved? Can you provide dimensional reports and material certifications?
- What is the expected prototype and production lead time, and what production capacity is available at the forecast volume?
- How are engineering changes controlled after tool release?
6. Design Compliance Into the Machine Early
Requirements depend on the machine type, products sold, installation site and jurisdiction. Treat the following as design inputs to verify with the relevant certification body, customer and authority having jurisdiction—not as a substitute for a formal compliance review.
Food and beverage sanitation
NSF/ANSI 25 covers vending machines for food and beverages. If the machine handles food or beverages, review sanitation, cleanability, materials and construction requirements early so the mechanical design does not need major changes after tooling.
Accessibility
ADA guidance places accessible operable parts within defined reach ranges. For unobstructed adult reach, 15 to 48 inches is a key design range, and operating force is generally limited to 5 lbf for covered operable parts. Confirm the exact requirements applicable to the installation and machine configuration.
Electrical safety and certification
Plan for the applicable U.S. electrical safety listing/certification requirements with the selected NRTL and component suppliers. Use recognized components where appropriate and maintain spacing, grounding, wiring, overcurrent protection and service-access requirements in the design.
Payment and data security
Use payment hardware and software from established payment vendors and follow the applicable payment-security and network requirements. Avoid placing raw card data handling inside custom machine software unless the architecture and compliance program specifically supports it.
Outdoor operation
If installed outdoors, design for rain, UV exposure, temperature extremes, condensation, corrosion, drainage, gasket compression and vandal resistance. Specify the environmental rating required for electrical enclosures and exposed modules.
7. Recommended Development and Sourcing Sequence
- Freeze product envelope, capacity, environment and target cost.
- Prototype and prove the dispensing mechanism using representative products.
- Create system architecture and preliminary BOM.
- Package commercial modules: payment, controller, display, refrigeration, motors and sensors.
- Develop industrial design and split large exterior surfaces into manufacturable thermoformed/fabricated panels.
- Complete DFM with plastic, metal and tool suppliers before final detailing.
- Build an engineering prototype and perform functional, serviceability, thermal, electrical and abuse testing.
- Update the drawings/BOM; issue production RFQs to at least two qualified suppliers for critical categories.
- Release long-lead production tooling only after design validation.
- Build pilot units using production-intent suppliers and processes; close quality and assembly issues.
- Finalize work instructions, inspection plan, service documentation, spare-parts list and supplier quality agreements.
- Launch production with controlled revisions and an engineering-change process.
| Make-or-buy principle: Buy mature commodity modules; custom-engineer the parts that create the machine’s differentiation. The highest-value custom work is usually the industrial design, product-handling geometry, molded housings/panels, interface brackets, software integration and branding. |
8. Where Om Raj Tech Fits Into the Vending-Machine Supply Chain
For OEMs developing vending machines, kiosks and other self-service equipment, Om Raj Tech can be engaged as a U.S. sourcing and manufacturing contact for custom plastic components, particularly parts suited to plastic injection molding and thermoforming. These processes cover many of the visible and functional parts highlighted throughout this guide.
Potential Vending-Machine Plastic Opportunities
- Thermoformed front fascias, door skins, side panels, top canopies and kick panels.
- Thermoformed inner liners, display surrounds, airflow ducts and service covers.
- Injection molded payment bezels, touchscreen surrounds and button modules.
- Injection molded product trays, lane dividers, pushers, guides and chutes.
- Retrieval-bin components, hinge covers, corner caps, trim pieces and protective housings.
- Plastic components designed to accept printed vinyl wraps, decals, labels and branded overlays.
Example plastic component families and graphics/overlay opportunities for vending-machine programs.
| DEVELOPING OR RESHORING A VENDING-MACHINE PLASTIC PART?
Plastic Injection Molding • Thermoforming • Michigan www.omrajtech.com | Call 248 843 9478 |
Source Notes
This guide expands the user-supplied article “The Anatomy of a Vending Machine: Plastics in Action.” Additional public references used for U.S. sourcing and design considerations:
- Thomasnet Supplier Discovery: https://www.thomasnet.com/suppliers
- Thomasnet Plastic Thermoforming Suppliers: https://www.thomasnet.com/suppliers/usa/plastic-thermoforming-61020202
- PMMI Sales Agent Directory: https://www.pmmi.org/sales-agent-directory
- NSF/ANSI 25 information for food and beverage vending machines: https://standards.nsf.org/discussion/nsfansi-25-2025-vending-machines-for-food-and-beverages-uploaded
- U.S. Access Board ADA Operable Parts Guide: https://www.access-board.gov/ada/guides/chapter-3-operable-parts/
- ADA.gov 2010 Standards Guidance: https://www.ada.gov/law-and-regs/design-standards/standards-guidance/
Disclaimer: Material choices, compliance requirements, part geometry and sourcing decisions depend on the exact machine, product, environment and production volume. Final engineering and certification decisions should be verified by qualified engineering, certification and supplier teams.